Building a Report

Reports allow you to visually display the data you collected through your form and share the results with others. In order to create a report, you must have an existing form.

Jump to...


Building Reports

Creating a Report

To create a report:

  1. Log in and go to Reports.
  2. Click + New Report.
  3. Under Select Data, choose the form you want to use—the one you want to pull entry data from.
  4. Add Widgets to your report.
  5. At the bottom of the page, click Save Report as you make edits.
  6. Go to Reports—click View to see the live report, or get the share link or embed code.
Report Settings: Title, Description & Export Setting

Go to the Report Settings tab to edit the title and description of the report. You can also choose if you want to allow people to download (export) the report.

If you edit the title of an existing report, it might affect the URLs of reports you've shared.
Select Data: Choosing a Form & All Entries vs. Selected Entries

Go to the Select Data tab to choose the form you want the report to be based on.

Each report can only show data from one form—you can't merge data from multiple forms into one report. But you can create multiple reports for one form.

You can choose to use All Entries in your report or just use Selected Entries. Choosing Selected Entries allows you to filter the data you use by creating one or more conditions.

Select Data: Creating Conditions to Filter Report Data


You can create a report based off only some of your entry data. For example, if you have a field in your report asking someone to choose the department they work in, you can create a report that only includes entries from that department.

To filter the data you want to use in your report:

  1. Log in and go to Reports.
  2. Under your existing report, click Edit.
  3. Click the Select Data tab.
  4. Choose selected entries from the first drop-down menu.
  5. Choose if you want any or all conditions to be true. ANY is the same as the OR operator and ALL is the same as the AND operator.
  6. Create your conditions. You can filter results by how people filled out the different fields in your form and by entry info. To add multiple conditions, click the green plus sign to the right of a condition.
  7. At the bottom of the page, click Save Report.
TIP! You can limit your report to a specific time period by creating a condition using the Date Created attribute in the Entry Info section of the drop-down menu. Learn more: How To Create a Time-Based Wufoo Report
Widgets: Adding Widgets & Widget Settings

Widgets are the building blocks of reports. They visualize and organize the data you collect through your form into charts, graphs, and tables.


Layout & Theme

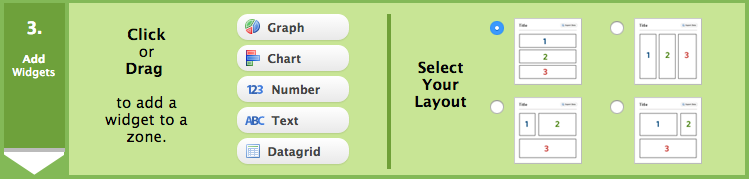
In the Add Widgets tab, you can choose from four different layouts that let you arrange your widgets into three zones. Within each zone, you can drag and drop your widgets in whatever order you want.

To change the logo, colors, fonts, and background of your report, you can apply the same theme you used for your form. You can select the theme for a report from the Report Manager.


Previewing, Sharing & Downloading Reports

Previewing a Report

When you're editing a report, the report preview doesn't pull in real entry data from your form—we just show you generally how the report will look with fake, static data in the widgets. It's also only about 75% of the size of a live report to make it easier to build reports on smaller screens like laptops.

To preview your report:

  1. Go to Reports.
  2. Beneath the report you're working on, click View.
  3. Keep that tab with your live report ready and waiting.
  4. Open a new tab and edit your report.
  5. As you edit and save changes to your report in that tab, refresh the tab with your live report to see how the settings affect how your data displays.
Sharing a Report

You can share your report with others or embed it on your site by clicking Widgets from the Report Manager.

Downloading a Report

In the Report Settings tab, you can choose to allow others to download (export) the report. This adds an Export Data button to the upper-right corner of your live report.

Why doesn’t my report show any data?

Reports don't have any widgets by default, so it's possible to create a blank report if you haven't added any widgets yet.

If you're only using Selected Entries in your report, make sure your conditions are set up right.

If you edited your report's title after sharing it, the link to your report might have changed. You'll need to share your report again.

Reports allow you to visually display the data you collected through your form and share the results with others. In order to create a report, you must have an existing form.

Create online forms

Add HTML forms to your site in a snap—no coding required.

Change Language